> ## Documentation Index
> Fetch the complete documentation index at: https://support.visualcare.com.au/llms.txt
> Use this file to discover all available pages before exploring further.
# Xero integration
> How to connect Visualcare to Xero for invoice and payroll export, sync contacts, and configure accounting codes
Visualcare integrates with Xero to export client invoices and worker timesheet data directly from VCore. Once the API connection is established, you sync contacts, pay items, and invoice items between the two systems and export on demand.
## Linking VCore to Xero
To export any client invoice or worker timesheet data, the API connection between VCore and Xero needs to be established first.
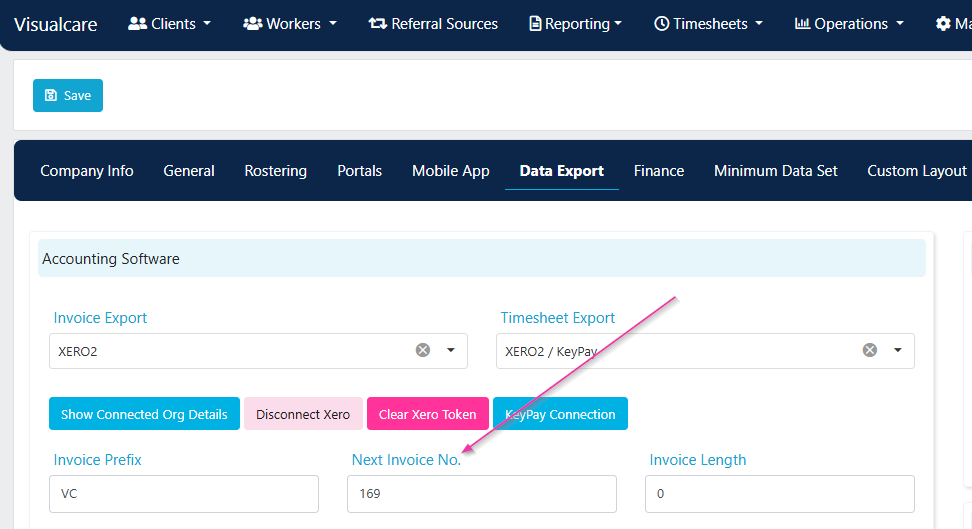
Go to **Settings** → **Data Export** → **Accounting Software**.
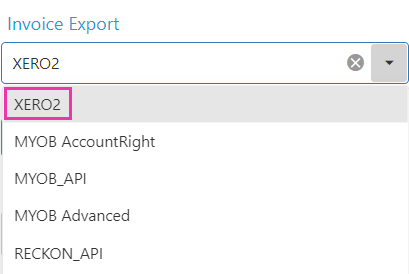
If you want to connect to Xero to invoice clients, select **XERO2** from the **Invoice Export** drop-down and click **Save**.
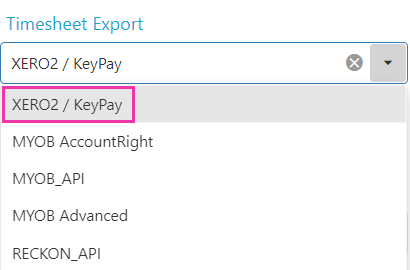
 If you want to connect to Xero to send worker timesheets, select **XERO2 / KeyPay** from the **Timesheet Export** drop-down and click **Save**.
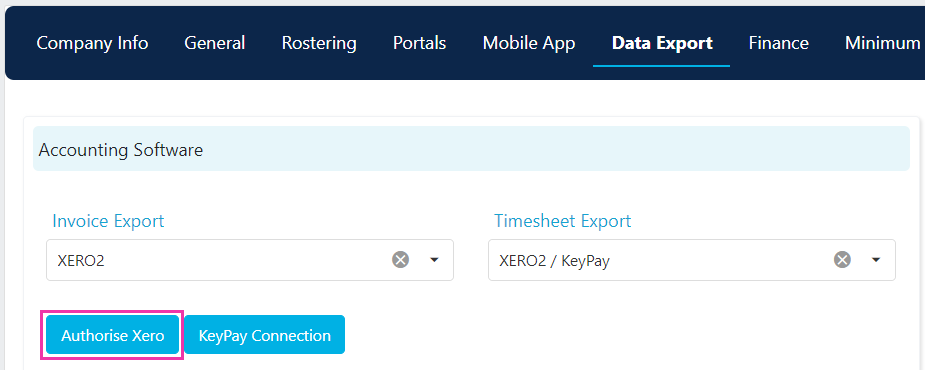
 Once the drop-downs have been selected, click **Authorise Xero**. Enter the company name when prompted, then proceed to connect to your Xero database.
 If you're already logged in to Xero, select the organisation to connect and click **Allow Access**.
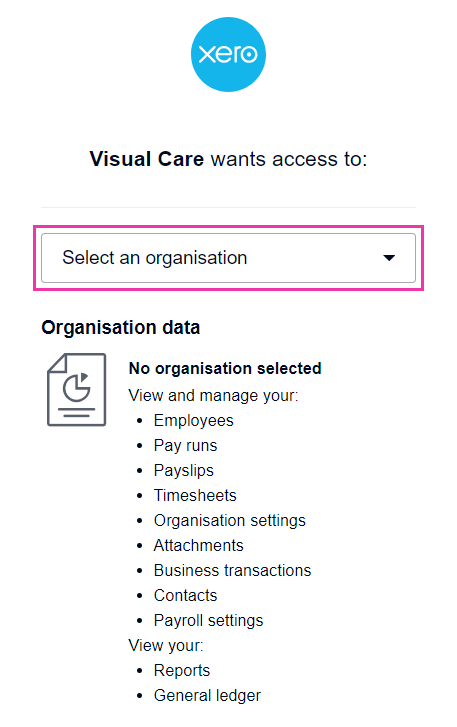 If you're not logged in to Xero, you'll need to log in first, then select the organisation and click **Allow Access**.
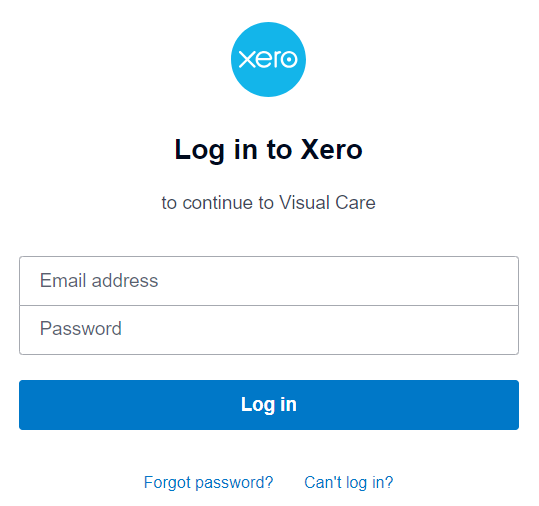 The authorisation screen requests access to several Xero scopes including Reports and Ledger. This access is used to retrieve invoice status from Xero back into Visualcare.
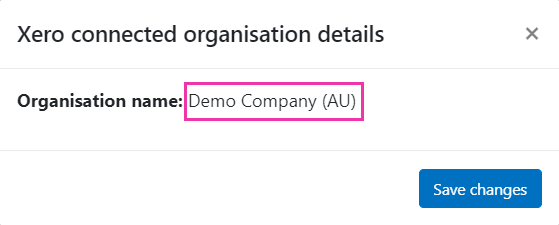
Once connected, you'll see options to remove the Xero connection or review the connected organisation. Click **Show Connected Org Details** to check.
The authorisation screen requests access to several Xero scopes including Reports and Ledger. This access is used to retrieve invoice status from Xero back into Visualcare.
Once connected, you'll see options to remove the Xero connection or review the connected organisation. Click **Show Connected Org Details** to check.
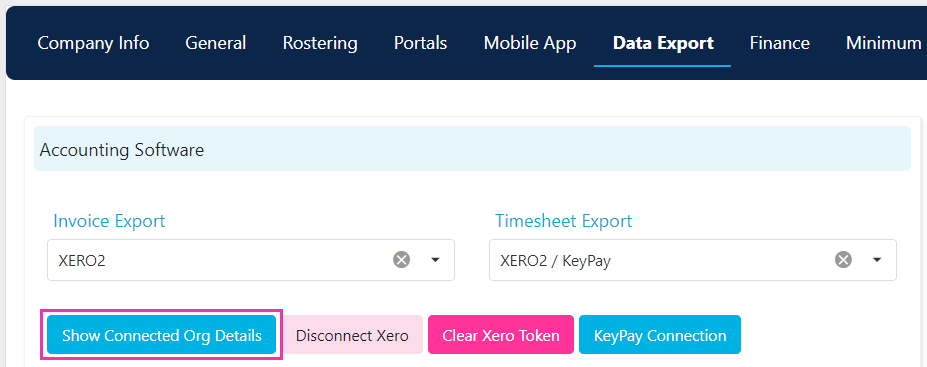 This opens the organisation details window:
 After the Xero connection has been established, items need to be synced from Xero into VCore. Under **Settings** → **Data Export** → **XERO**, click each of the sync buttons.
 These pull the relevant lists of items into drop-downs throughout VCore. For example, **Sync Contacts** obtains the list of contacts from Xero and populates the following drop-downs in VCore:
| VCore field | Xero source |
| ----------------------------------- | ----------------------------------------- |
| Client profile: **Accounting Code** | Customer contacts from Xero |
| Payer profile: **Accounting Code** | Customer contacts from Xero |
| Worker profile: **Accounting Code** | Employees and supplier contacts from Xero |
## Set up
### Payers
Payers link to a client profile or client agreement so that invoices export to the correct Xero contact. Payer profiles are created in **Maintenance** → **Payers**.
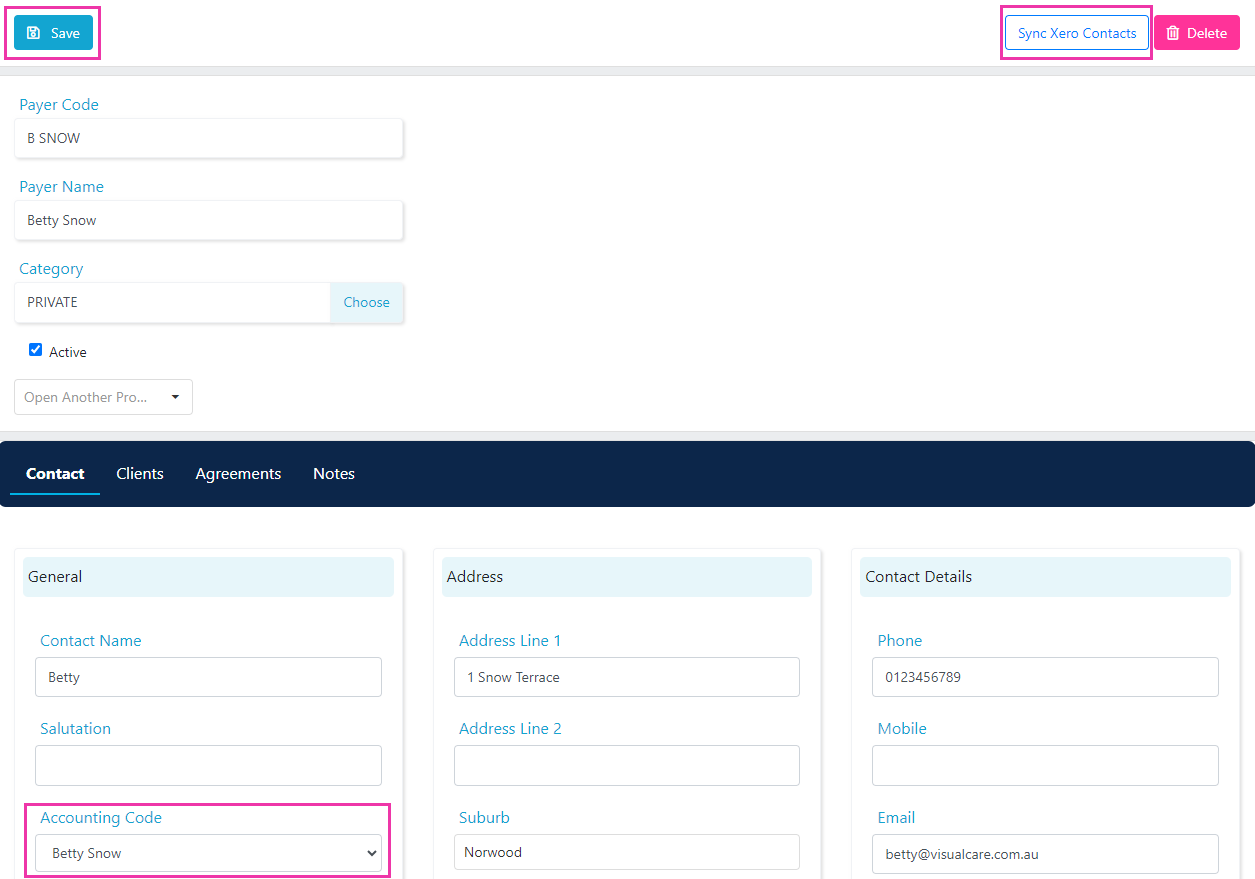
Once created, select an **Accounting Code** for the payer from the drop-down list in the **Contact** section. This drop-down is populated with contacts from Xero. Once selected, click **Save** in the top-left corner.
If the Xero contact is not listed in the drop-down, make sure the contact is set up in Xero and click the **sync contacts** button in the top-right corner. If the contact still doesn't appear, the Xero connection may need to be re-established (see the linking steps above).
These pull the relevant lists of items into drop-downs throughout VCore. For example, **Sync Contacts** obtains the list of contacts from Xero and populates the following drop-downs in VCore:
| VCore field | Xero source |
| ----------------------------------- | ----------------------------------------- |
| Client profile: **Accounting Code** | Customer contacts from Xero |
| Payer profile: **Accounting Code** | Customer contacts from Xero |
| Worker profile: **Accounting Code** | Employees and supplier contacts from Xero |
## Set up
### Payers
Payers link to a client profile or client agreement so that invoices export to the correct Xero contact. Payer profiles are created in **Maintenance** → **Payers**.
Once created, select an **Accounting Code** for the payer from the drop-down list in the **Contact** section. This drop-down is populated with contacts from Xero. Once selected, click **Save** in the top-left corner.
If the Xero contact is not listed in the drop-down, make sure the contact is set up in Xero and click the **sync contacts** button in the top-right corner. If the contact still doesn't appear, the Xero connection may need to be re-established (see the linking steps above).
 ### Clients
Once payer profiles are created, you set up client profiles for export. There are three places the system looks to export invoices for a client:
1. Agreement payer
2. Client profile payer
3. Client profile accounting code
### Clients
Once payer profiles are created, you set up client profiles for export. There are three places the system looks to export invoices for a client:
1. Agreement payer
2. Client profile payer
3. Client profile accounting code
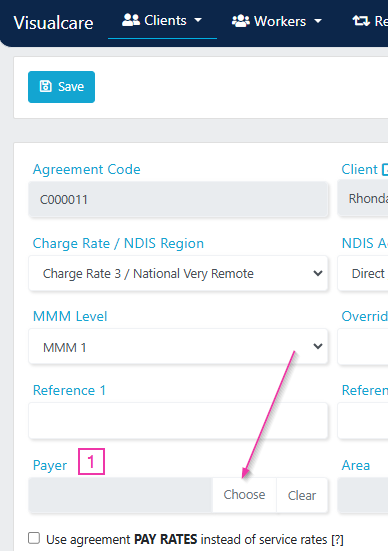
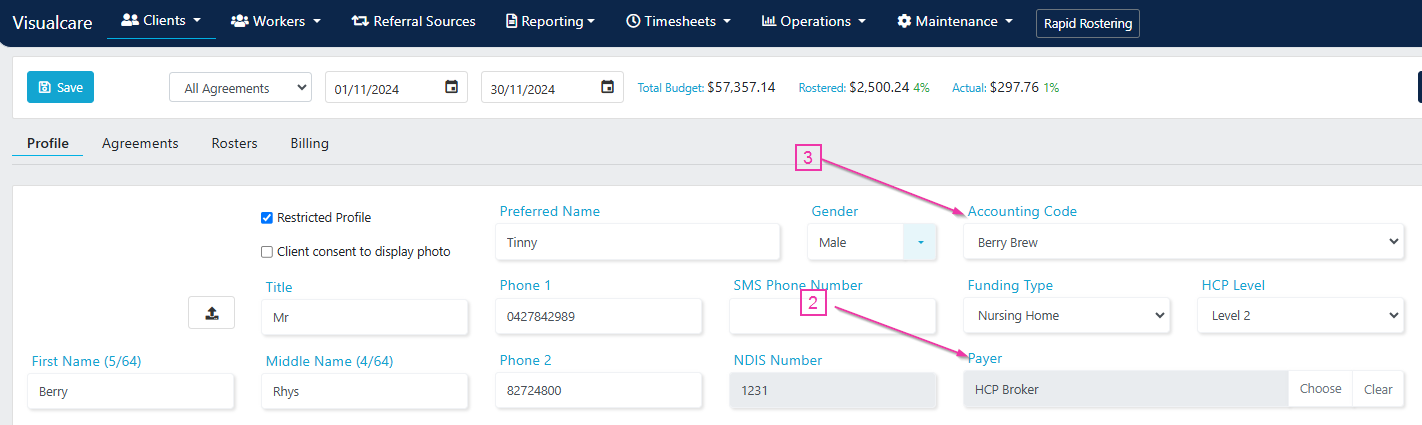 If the agreement **Payer** field (1) is blank, the system looks for the **Payer** listed in the client profile (2). If that is also blank, the system exports to the client profile **Accounting Code** (3).
This method allows you to have different Xero contacts invoiced for the same client depending on the payer selected at the agreement level. For example, you may have an NDIS participant who is both plan managed and self managed. For the plan managed shifts, you create a payer profile of the plan manager and select that payer in one agreement. You then have another agreement with the payer blank, and if the client profile payer is also blank, the system looks at the client profile **Accounting Code** to export for that agreement.
**Sending a client contact to Xero**
When creating a client profile in VCore, if that client also needs to be set up as a contact in Xero, click the **Send contact to Xero** button after saving.
If the agreement **Payer** field (1) is blank, the system looks for the **Payer** listed in the client profile (2). If that is also blank, the system exports to the client profile **Accounting Code** (3).
This method allows you to have different Xero contacts invoiced for the same client depending on the payer selected at the agreement level. For example, you may have an NDIS participant who is both plan managed and self managed. For the plan managed shifts, you create a payer profile of the plan manager and select that payer in one agreement. You then have another agreement with the payer blank, and if the client profile payer is also blank, the system looks at the client profile **Accounting Code** to export for that agreement.
**Sending a client contact to Xero**
When creating a client profile in VCore, if that client also needs to be set up as a contact in Xero, click the **Send contact to Xero** button after saving.
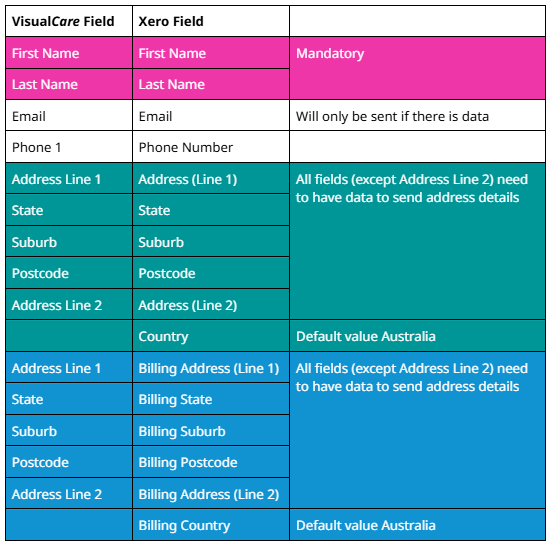
 This creates a new customer contact in Xero and sends the following fields:
 ### Workers
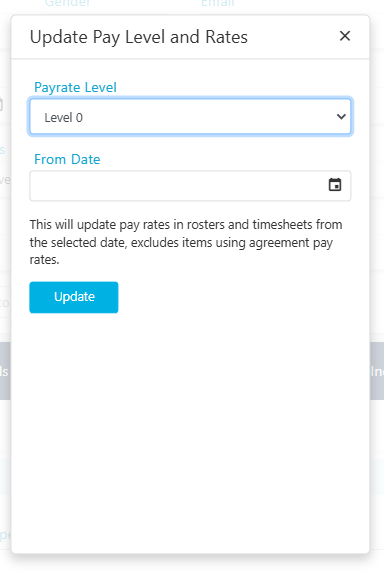
First, make sure the worker has the correct **Payrate Level** set in **Worker Profile** → **Finance** → **Worker Details** → **Update Pay Level and Rates**.
For suppliers, the **Payrate Level** needs to be set to 0 for export. For employees, select the applicable **Payrate Level**.
### Workers
First, make sure the worker has the correct **Payrate Level** set in **Worker Profile** → **Finance** → **Worker Details** → **Update Pay Level and Rates**.
For suppliers, the **Payrate Level** needs to be set to 0 for export. For employees, select the applicable **Payrate Level**.
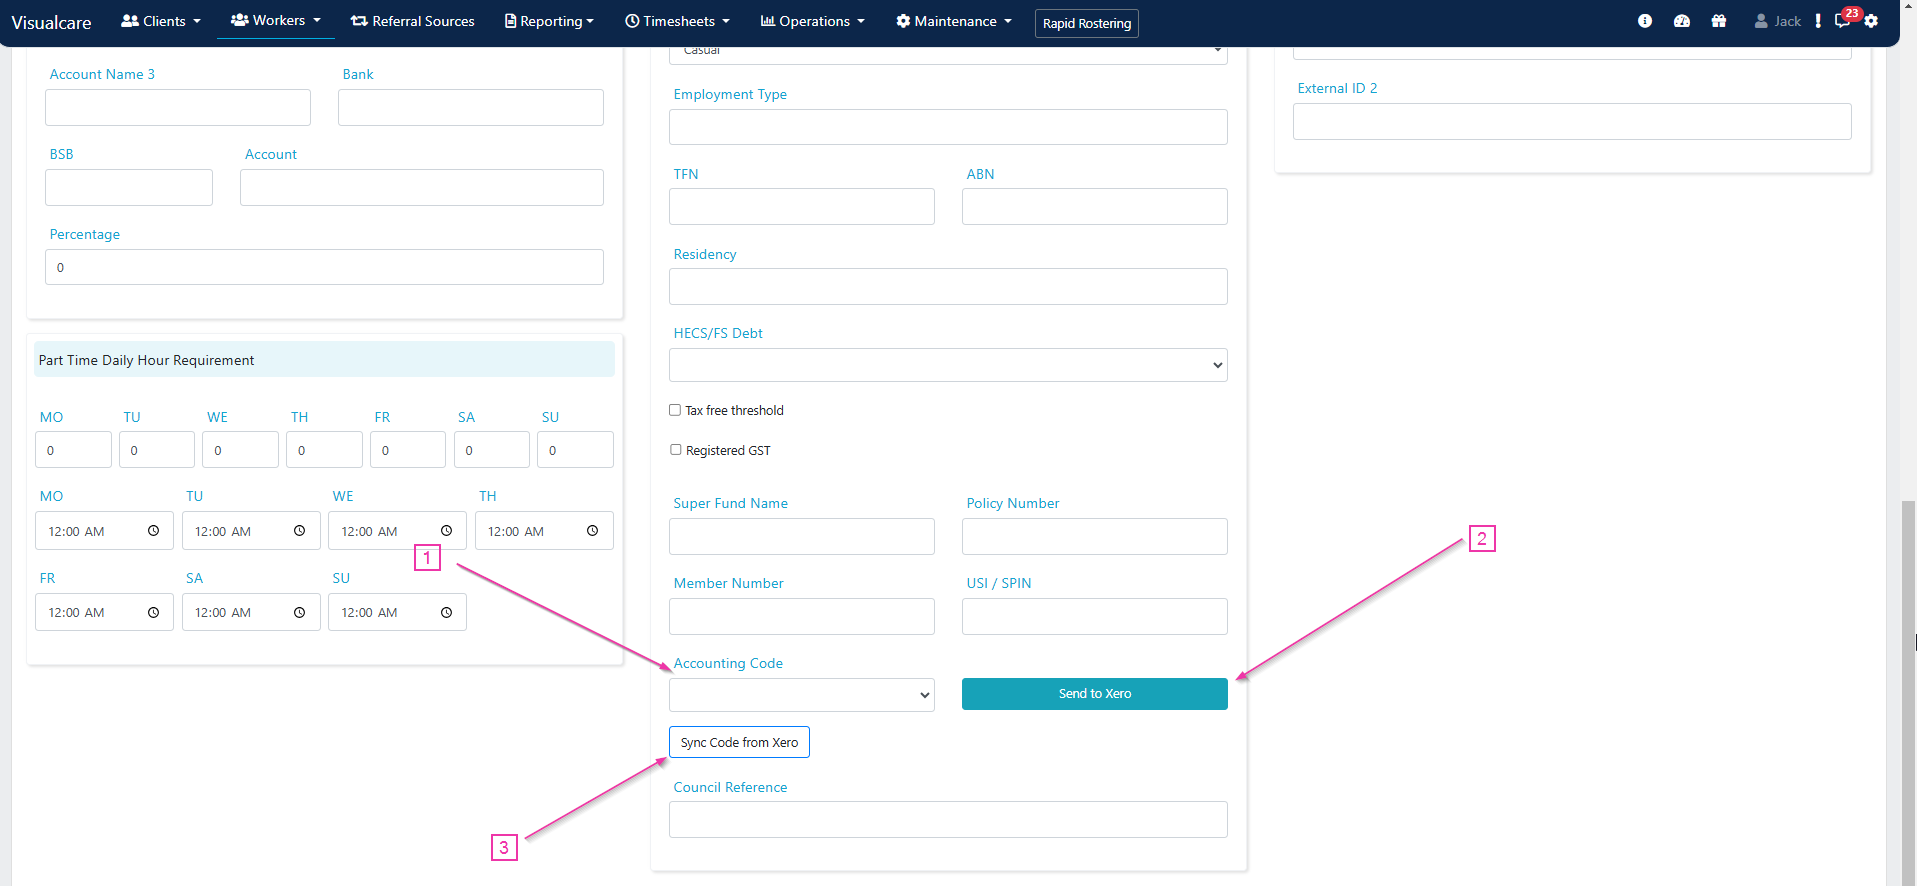
 At the bottom of the page there is a drop-down for the worker **Accounting Code** (1). This lists all employees and suppliers you've created as employees and contacts in Xero. Select the correct employee or supplier from the drop-down and click **Save** at the top-left of the page. This tells Visualcare which Xero employee or supplier to export their timesheets to.
When creating a worker profile in VCore, if that worker also needs to be set up as an employee in Xero, save the profile, go to the **Finance** tab, and under **Worker Details** click the **Send to Xero** button (2). Then click **Sync Contacts from Xero** (3) which brings the newly created contact back to the drop-down to select as an **Accounting Code**.
Setting employees up in Xero first is the recommended approach, since pay templates, tax details, and super are configured there. **Send to Xero** only creates a snapshot of the Visualcare data.
At the bottom of the page there is a drop-down for the worker **Accounting Code** (1). This lists all employees and suppliers you've created as employees and contacts in Xero. Select the correct employee or supplier from the drop-down and click **Save** at the top-left of the page. This tells Visualcare which Xero employee or supplier to export their timesheets to.
When creating a worker profile in VCore, if that worker also needs to be set up as an employee in Xero, save the profile, go to the **Finance** tab, and under **Worker Details** click the **Send to Xero** button (2). Then click **Sync Contacts from Xero** (3) which brings the newly created contact back to the drop-down to select as an **Accounting Code**.
Setting employees up in Xero first is the recommended approach, since pay templates, tax details, and super are configured there. **Send to Xero** only creates a snapshot of the Visualcare data.
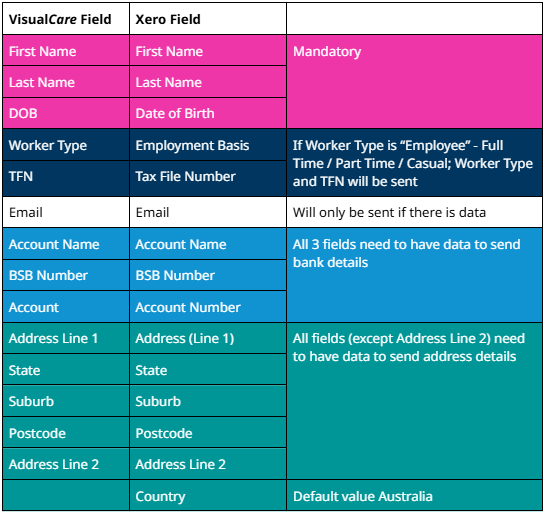
 The fields below sync across to Xero when sending worker profile data. Items highlighted in pink are mandatory.
 ### Services (charge)
The charge amount for a service is set in **Maintenance** → **Services**.
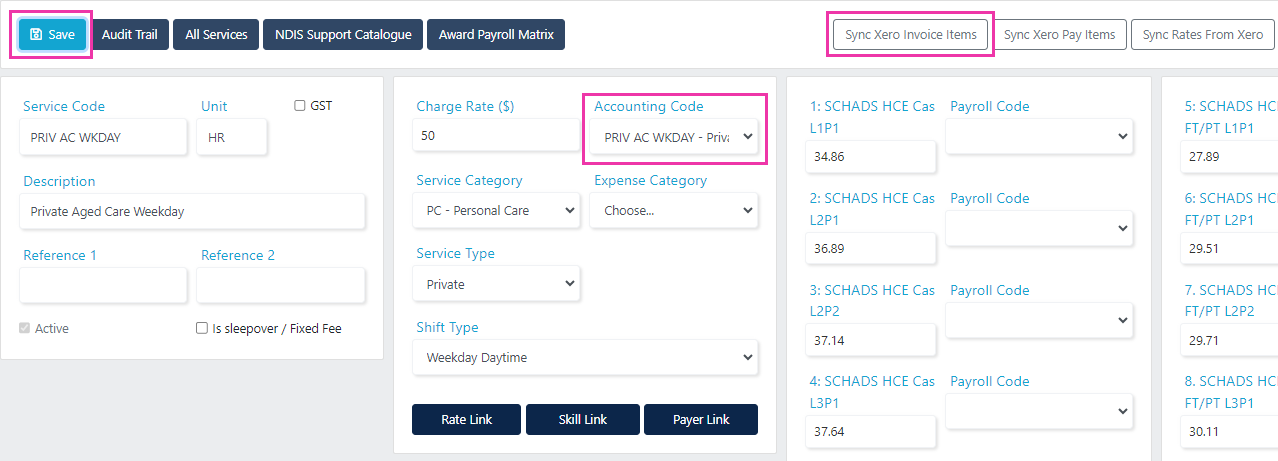
You also need to select an **Accounting Code** for the service for export. This is the inventory item you've created in Xero. If the item you need is not listed, make sure it is set up in Xero and click **Sync Xero Invoice Items** in the top-right corner to bring them across.
Once the **Accounting Code** and all other relevant information is updated, click **Save** in the top-left corner.
### Services (charge)
The charge amount for a service is set in **Maintenance** → **Services**.
You also need to select an **Accounting Code** for the service for export. This is the inventory item you've created in Xero. If the item you need is not listed, make sure it is set up in Xero and click **Sync Xero Invoice Items** in the top-right corner to bring them across.
Once the **Accounting Code** and all other relevant information is updated, click **Save** in the top-left corner.
 ### Services (pay)
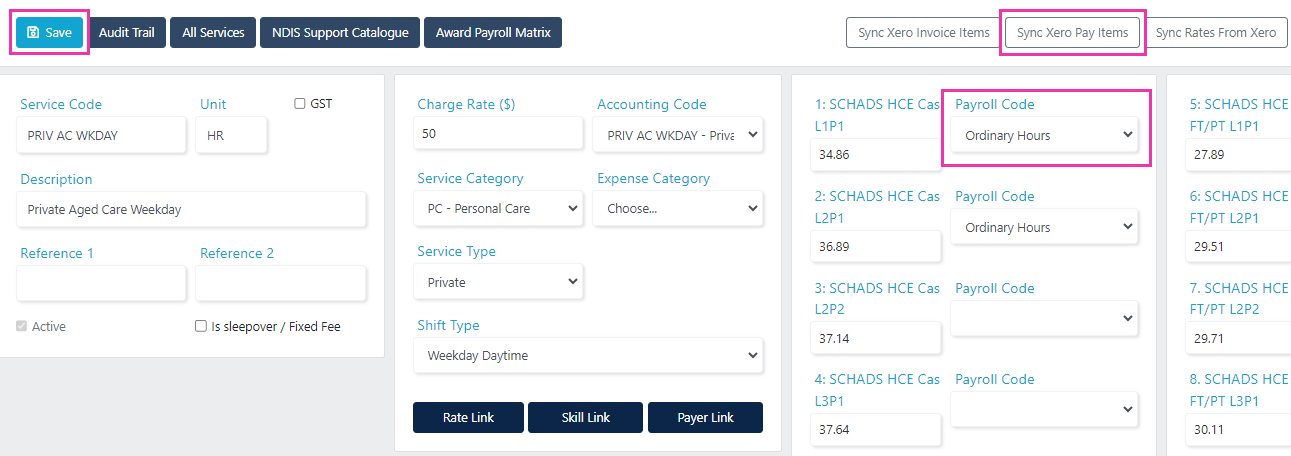
For paying the worker, Visualcare matches the service and the worker payrate level to find the payroll code to export. Payroll codes need to be selected for each service and payrate level when applicable for a successful export.
To select a **Payroll Code**, go to **Maintenance** → **Services**, select a service from the bottom table, and choose the **Payroll Code** from the drop-down for each pay level. Click **Save** in the top-left corner. If the pay item you need is not listed, make sure it is set up in Xero and click **Sync Xero Pay Items** in the top-right corner.
The pay rate amount listed is not exported for employee payroll. Only the payroll code is sent to Xero. The amount is sent for supplier payments, however.
### Services (pay)
For paying the worker, Visualcare matches the service and the worker payrate level to find the payroll code to export. Payroll codes need to be selected for each service and payrate level when applicable for a successful export.
To select a **Payroll Code**, go to **Maintenance** → **Services**, select a service from the bottom table, and choose the **Payroll Code** from the drop-down for each pay level. Click **Save** in the top-left corner. If the pay item you need is not listed, make sure it is set up in Xero and click **Sync Xero Pay Items** in the top-right corner.
The pay rate amount listed is not exported for employee payroll. Only the payroll code is sent to Xero. The amount is sent for supplier payments, however.
 For more information on configuring settings for Xero, see [Data export settings](/finance/invoicing-sync). For information on how to export to Xero, see [Exporting payroll data](/finance/exporting-payroll-data).
## Tracking categories
Xero tracking categories let you tag invoice and payroll entries with an additional dimension, such as region, funding type, or cost centre, so you can report on them separately in Xero.
Visualcare maps a field from its data to a tracking category, so every exported entry carries the correct tracking value. There are two category slots:
| Category | Purpose |
| -------------- | ------------------------------------------------------------ |
| **Category 1** | Invoice tracking |
| **Category 2** | Payroll tracking (requires enablement by Visualcare support) |
The value in Visualcare must exactly match the tracking category value in Xero. A mismatch causes a "tracking ID failed" error on export.
### Configuring tracking categories
Go to **Settings** → **Data Export** and tick the **Tracking** checkbox. Fields for **Category Name** and **Link to Field** appear.
In **Category Name**, type the exact name of the tracking category as it appears in Xero, for example `Region`. Check in Xero under **Settings** → **Accounting** → **Tracking Categories** to confirm the exact name before entering it here.
Under **Link to Field**, choose the Visualcare field whose values populate the tracking category. The available fields differ between Category 1 and Category 2:
| Field | Category 1 (invoices) | Category 2 (payroll) |
| --------------------------- | --------------------- | -------------------- |
| Agreement Reference 1 | Yes | Yes |
| Agreement Type | Yes | Yes |
| Area | Yes | Yes |
| Client Division | No | Yes |
| Client Funding Type | Yes | No |
| Client Name | No | Yes |
| Client Type | Yes | Yes |
| Service Reference 1 | Yes | Yes |
| Service Type | Yes | Yes |
| Worker Division Description | No | Yes |
| Worker Name | Yes | Yes |
The values in the Visualcare field you select must match the tracking category options in Xero exactly. For example, if your Xero "Region" category has the options North, South, East, and West, your Visualcare **Area** field values need to use those same names.
### Limitations
**Tracking invoices by client name**
Xero's tracking category setup links to a Visualcare field rather than the client record itself, so there's no direct way to track invoices by participant name using Category 1.
As a workaround, you can enter the client name manually in **Agreement Reference 1** and link that field to Category 1. This is a manual step per agreement and doesn't scale well for large client lists.
**Location roster shifts**
Location roster shifts have no associated agreement, so fields like **Agreement Reference 1** have no value for those shifts. Linking a tracking category to an agreement-based field produces export errors for location roster shifts. Tracking by **Area** (the worker's area) is a more reliable option for providers using location rosters, though this maps to the house or location rather than individual participants.
**Payroll tracking (Category 2)**
Category 2 for payroll tracking is not active by default. Contact **[support@visualcare.com.au](mailto:support@visualcare.com.au)** to have it enabled.
When payroll tracking is enabled, Visualcare amalgamates hours to the pay item before applying the tracking value. If a worker has hours under multiple funding types on the same pay item, only the tracking value from the first entry is applied. To track payroll by funding type accurately, separate pay items per funding type are needed.
## Common errors
When exporting data to Xero, the system may display configuration errors that are causing the export to fail. Below is a list of common errors with solutions. If the solution doesn't resolve your issue or the error is not listed, contact **[support@visualcare.com.au](mailto:support@visualcare.com.au)** for help.
### Invoicing errors
#### Export summary errors
These errors appear on the export summary pop-up if the setup is incorrect.
For more information on configuring settings for Xero, see [Data export settings](/finance/invoicing-sync). For information on how to export to Xero, see [Exporting payroll data](/finance/exporting-payroll-data).
## Tracking categories
Xero tracking categories let you tag invoice and payroll entries with an additional dimension, such as region, funding type, or cost centre, so you can report on them separately in Xero.
Visualcare maps a field from its data to a tracking category, so every exported entry carries the correct tracking value. There are two category slots:
| Category | Purpose |
| -------------- | ------------------------------------------------------------ |
| **Category 1** | Invoice tracking |
| **Category 2** | Payroll tracking (requires enablement by Visualcare support) |
The value in Visualcare must exactly match the tracking category value in Xero. A mismatch causes a "tracking ID failed" error on export.
### Configuring tracking categories
Go to **Settings** → **Data Export** and tick the **Tracking** checkbox. Fields for **Category Name** and **Link to Field** appear.
In **Category Name**, type the exact name of the tracking category as it appears in Xero, for example `Region`. Check in Xero under **Settings** → **Accounting** → **Tracking Categories** to confirm the exact name before entering it here.
Under **Link to Field**, choose the Visualcare field whose values populate the tracking category. The available fields differ between Category 1 and Category 2:
| Field | Category 1 (invoices) | Category 2 (payroll) |
| --------------------------- | --------------------- | -------------------- |
| Agreement Reference 1 | Yes | Yes |
| Agreement Type | Yes | Yes |
| Area | Yes | Yes |
| Client Division | No | Yes |
| Client Funding Type | Yes | No |
| Client Name | No | Yes |
| Client Type | Yes | Yes |
| Service Reference 1 | Yes | Yes |
| Service Type | Yes | Yes |
| Worker Division Description | No | Yes |
| Worker Name | Yes | Yes |
The values in the Visualcare field you select must match the tracking category options in Xero exactly. For example, if your Xero "Region" category has the options North, South, East, and West, your Visualcare **Area** field values need to use those same names.
### Limitations
**Tracking invoices by client name**
Xero's tracking category setup links to a Visualcare field rather than the client record itself, so there's no direct way to track invoices by participant name using Category 1.
As a workaround, you can enter the client name manually in **Agreement Reference 1** and link that field to Category 1. This is a manual step per agreement and doesn't scale well for large client lists.
**Location roster shifts**
Location roster shifts have no associated agreement, so fields like **Agreement Reference 1** have no value for those shifts. Linking a tracking category to an agreement-based field produces export errors for location roster shifts. Tracking by **Area** (the worker's area) is a more reliable option for providers using location rosters, though this maps to the house or location rather than individual participants.
**Payroll tracking (Category 2)**
Category 2 for payroll tracking is not active by default. Contact **[support@visualcare.com.au](mailto:support@visualcare.com.au)** to have it enabled.
When payroll tracking is enabled, Visualcare amalgamates hours to the pay item before applying the tracking value. If a worker has hours under multiple funding types on the same pay item, only the tracking value from the first entry is applied. To track payroll by funding type accurately, separate pay items per funding type are needed.
## Common errors
When exporting data to Xero, the system may display configuration errors that are causing the export to fail. Below is a list of common errors with solutions. If the solution doesn't resolve your issue or the error is not listed, contact **[support@visualcare.com.au](mailto:support@visualcare.com.au)** for help.
### Invoicing errors
#### Export summary errors
These errors appear on the export summary pop-up if the setup is incorrect.
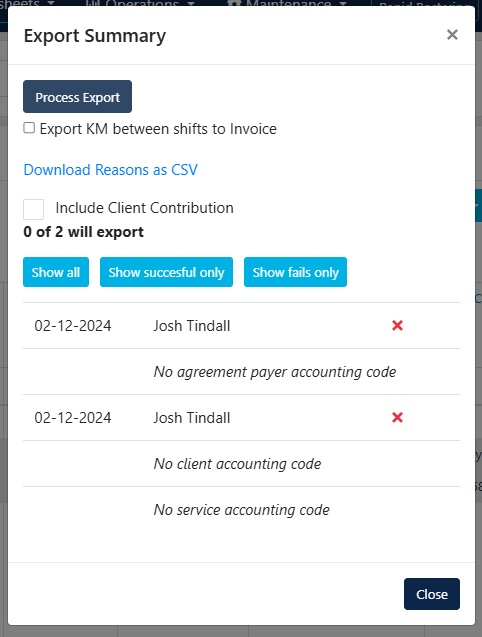 | Error | How to resolve |
| -------------------------------------- | -------------------------------------------------------------------------------------------------------------------------------------------------------------------------------------------------------------------------------- |
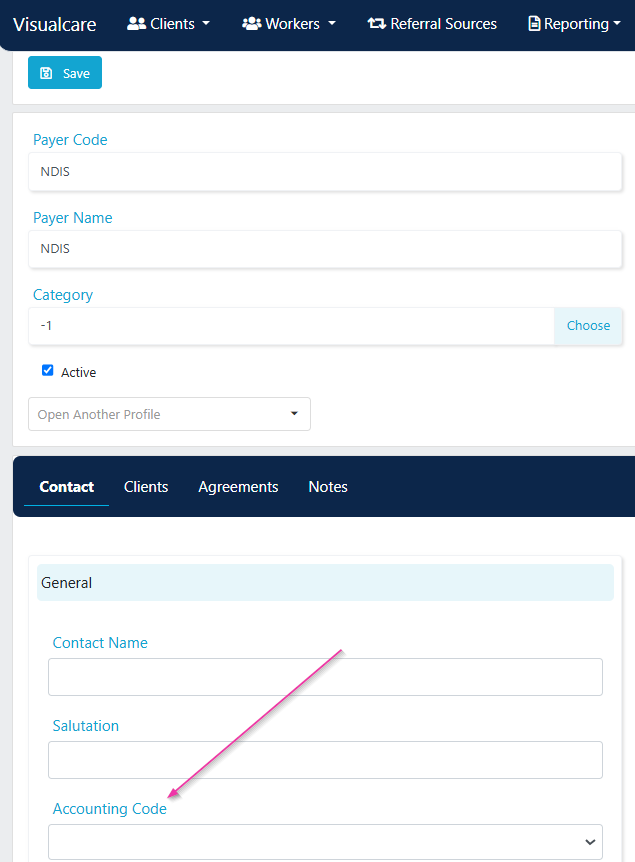
| **No agreement payer accounting code** | Go to **Maintenance** → **Payers**, search for the payer missing an accounting code, click on it, and select an **Accounting Code** from the drop-down. If the contact is not listed, click **sync contacts** in the top-right. |
| **No client payer accounting code** | Same resolution as above. |
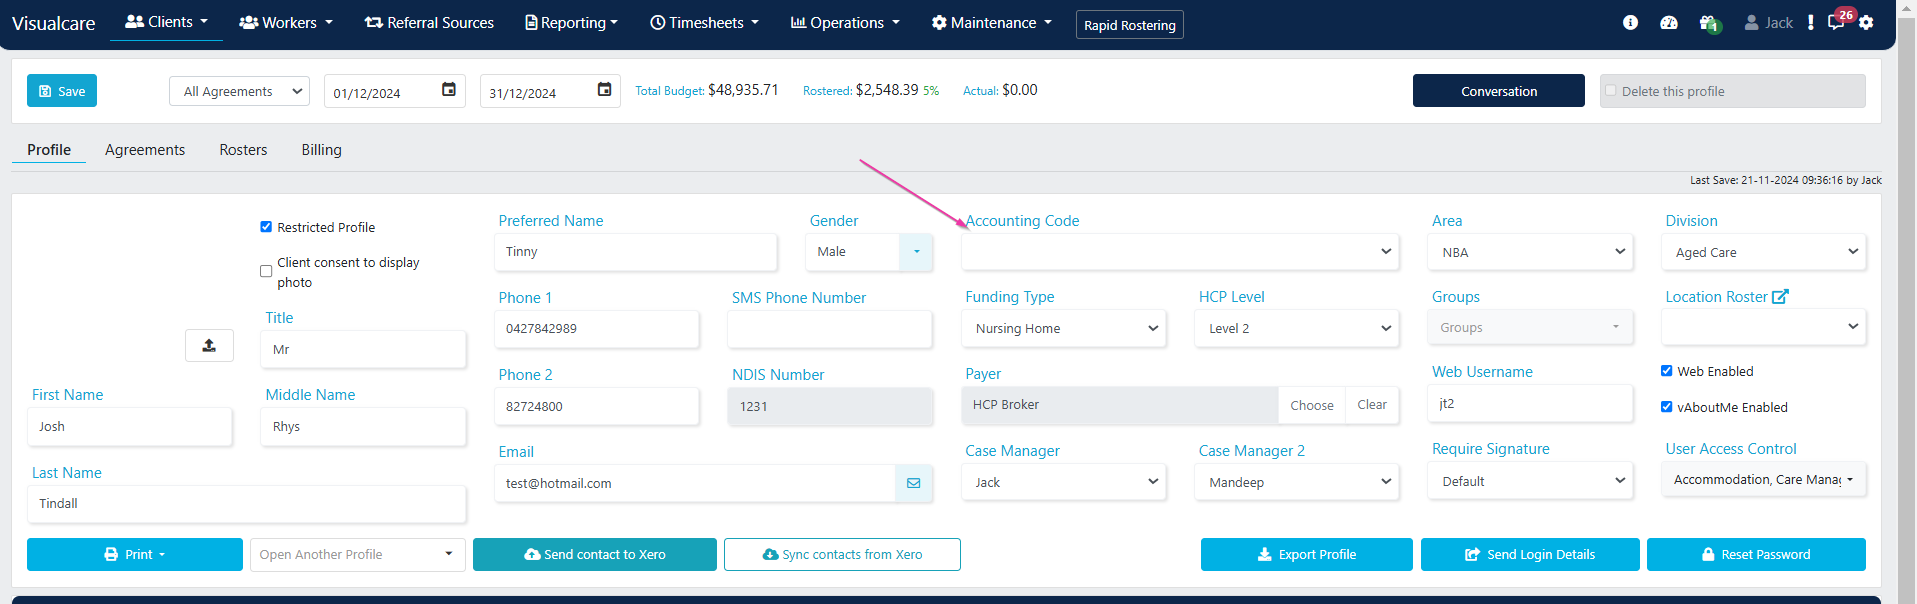
| **Client missing accounting code** | Go to the client profile and select a code in the **Accounting Code** drop-down or select a **Payer** if applicable. |
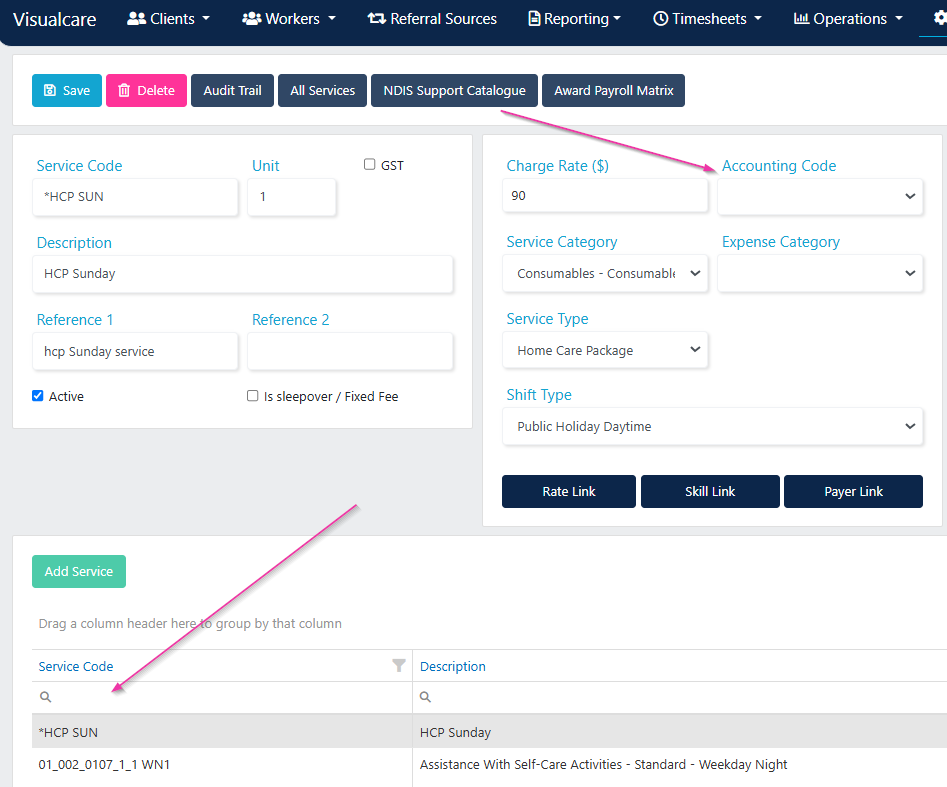
| **Service missing accounting code** | Go to **Maintenance** → **Services**, search for the service missing an **Accounting Code**, click on it, and select the code from the drop-down. If the code is not listed, click **Sync Xero Invoice Items** in the top-right. |
| Error | How to resolve |
| -------------------------------------- | -------------------------------------------------------------------------------------------------------------------------------------------------------------------------------------------------------------------------------- |
| **No agreement payer accounting code** | Go to **Maintenance** → **Payers**, search for the payer missing an accounting code, click on it, and select an **Accounting Code** from the drop-down. If the contact is not listed, click **sync contacts** in the top-right. |
| **No client payer accounting code** | Same resolution as above. |
| **Client missing accounting code** | Go to the client profile and select a code in the **Accounting Code** drop-down or select a **Payer** if applicable. |
| **Service missing accounting code** | Go to **Maintenance** → **Services**, search for the service missing an **Accounting Code**, click on it, and select the code from the drop-down. If the code is not listed, click **Sync Xero Invoice Items** in the top-right. |
 #### Export status errors
If you get an error on the export status page before clicking **Start Import**, it means the payer, client, or service does not have an accounting code selected. See the resolutions above.
#### Export status errors
If you get an error on the export status page before clicking **Start Import**, it means the payer, client, or service does not have an accounting code selected. See the resolutions above.
 | Error | How to resolve |
| ------------------------------------------------------------- | ----------------------------------------------------------------------------------------------------------------------------------------------------------------------------------------------------------------------------------- |
| **Accounting code missing in Visualcare - try syncing again** | Go to **Settings** → **Data Export** → **XERO** and click all the sync buttons, then try the export again. |
| **Missing code in Xero** (service-related) | Make sure the inventory item is set up and active in Xero. |
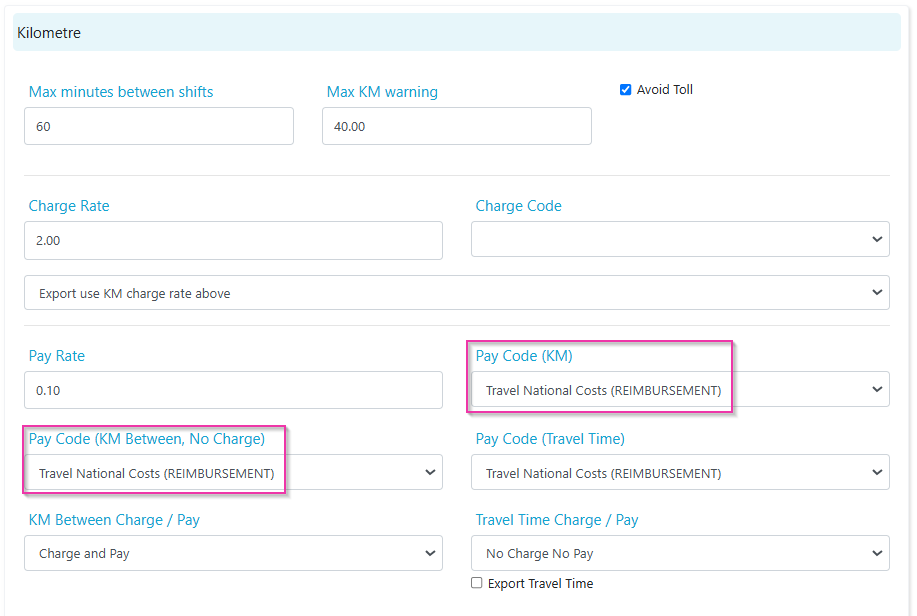
| **Missing code in Xero** (kilometre-related) | Go to **Settings** → **Finance** → **Kilometre** and make sure the codes are entered. Also check the client agreement to see if override has been ticked. If so, make sure a code is selected or untick override if not applicable. |
| **Error: To update fields on a paid invoice line item** | Go to **Settings** → **Data Export** → **Accounting Software** and update the **Next Invoice Number**. This occurs when the next invoice number has already been created in Xero. |
| **Invoice not of valid status for modification** | Same resolution as above. |
| Error | How to resolve |
| ------------------------------------------------------------- | ----------------------------------------------------------------------------------------------------------------------------------------------------------------------------------------------------------------------------------- |
| **Accounting code missing in Visualcare - try syncing again** | Go to **Settings** → **Data Export** → **XERO** and click all the sync buttons, then try the export again. |
| **Missing code in Xero** (service-related) | Make sure the inventory item is set up and active in Xero. |
| **Missing code in Xero** (kilometre-related) | Go to **Settings** → **Finance** → **Kilometre** and make sure the codes are entered. Also check the client agreement to see if override has been ticked. If so, make sure a code is selected or untick override if not applicable. |
| **Error: To update fields on a paid invoice line item** | Go to **Settings** → **Data Export** → **Accounting Software** and update the **Next Invoice Number**. This occurs when the next invoice number has already been created in Xero. |
| **Invoice not of valid status for modification** | Same resolution as above. |


 ### Payroll errors
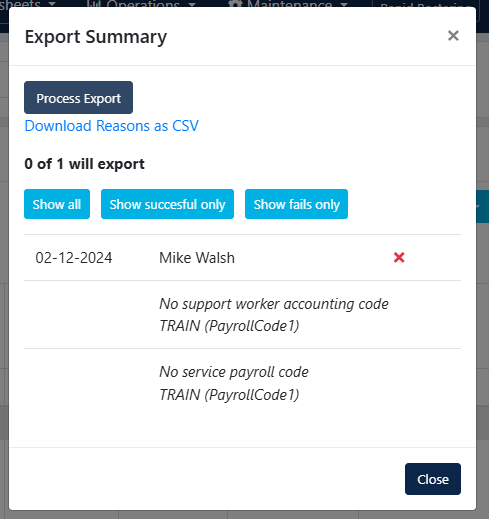
#### Export summary errors
| Error | How to resolve |
| ------------------------------------- | ---------------------------------------------------------------------------------------------------------------------------------------------------------------------------------------------- |
| **No support worker accounting code** | Go to **Worker Profile** → **Finance** and select an **Accounting Code** in the worker profile. See the Workers set up section above. |
| **No service payroll code** | Go to **Maintenance** → **Services**, search for the service, click on it, and select a payroll code for the level you were attempting to export. See the Services (pay) set up section above. |
### Payroll errors
#### Export summary errors
| Error | How to resolve |
| ------------------------------------- | ---------------------------------------------------------------------------------------------------------------------------------------------------------------------------------------------- |
| **No support worker accounting code** | Go to **Worker Profile** → **Finance** and select an **Accounting Code** in the worker profile. See the Workers set up section above. |
| **No service payroll code** | Go to **Maintenance** → **Services**, search for the service, click on it, and select a payroll code for the level you were attempting to export. See the Services (pay) set up section above. |
 #### Export status errors
| Error | How to resolve |
| --------------------------------------------------------------------- | ----------------------------------------------------------------------------------------------------------------------------------------------------------------------------------------------------------------------------------------------------------------------------------------------------------------------------------------------------------------------------------------------------------------------------------------------------------------------------------------------------------------------------------------------------------------------------- |
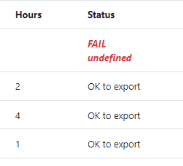
| **FAIL undefined** or **Array no session** | Go to **Settings** → **Data Export** and click the pink **Clear Xero Token**. Navigate back to the same page and click **Authorise Xero**. Log into your Xero to re-establish the connection. Sync pay items and try the export again. |
| **Employee doesn't have a pay run calendar** | Make sure the worker has a pay calendar set in Xero. |
| **FAIL! Null** | This occurs when too many first aid allowances are exported. Select fewer items for export. |
| **Employee name not found in Xero** | Go to the worker profile and make sure a worker accounting code is selected. This error is also caused by an apostrophe in the employee name on Xero preventing the data from being read. Remove the apostrophe from the Xero contact, resync, reselect the worker accounting code, and try the export again. |
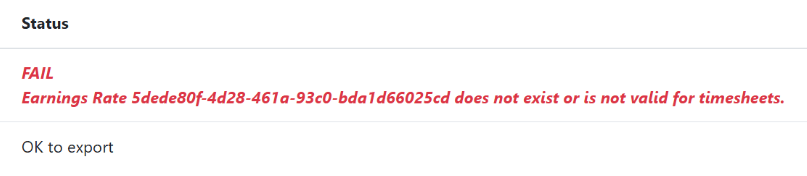
| **FAIL: Earnings Rate does not exist or is not valid for timesheets** | Check the pay item on Xero. Common causes: (1) the **Types of Units** for the pay item is not set to **Hours**, (2) the Xero pay item is not set up or active, (3) exporting a payroll code not in the pay template for the employee, (4) the pay item is set as an allowance, or (5) an apostrophe in a pay item name. Make sure the item is correctly set up as OTE or Reimbursement with Type of Units as Hours and is active. If using pay templates, make sure it has been added to the template. Remove any apostrophes in pay items, resync, and try the export again. |
| **TrackingItemID is required for each timesheet line** | This occurs when timesheet tracking is enabled in Xero but not set up in Visualcare. Either disable timesheet tracking on Xero or contact [support@visualcare.com.au](mailto:support@visualcare.com.au) to set up timesheet tracking. Have your Xero category name and options ready along with the Visualcare field you'd like to map to. |
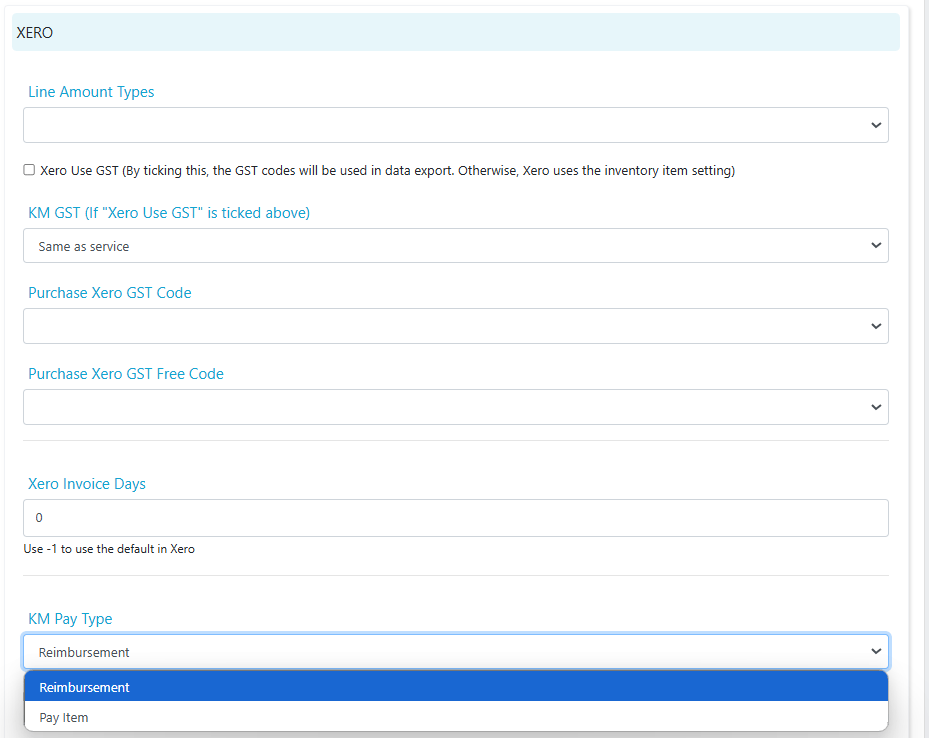
| **FAIL A validation exception occurred** | This is due to a mismatch with the kilometre pay type and pay codes. Go to **Settings** → **Finance** → **Kilometre** and check how your KM pay codes are set up in Xero. Then go to **Settings** → **Data Export** → **XERO** → **KM Pay Type** and select **pay item** if the codes are Ordinary Time Earnings, or **reimbursement** if they're reimbursements. |
| **No pay runs found** | This occurs when you export kilometres without a matching pay run. Create a pay run in Xero for the time period and try the KM export again. |
| **No payslips found on payrun** | This occurs when you attempt to export kilometres or expenses but the timesheets have not been approved in Xero. Approve timesheets in Xero and try the export again. |
| **Provided period doesn't correspond with a pay period** | Check the pay calendar set up on Xero for the employee. |
#### Export status errors
| Error | How to resolve |
| --------------------------------------------------------------------- | ----------------------------------------------------------------------------------------------------------------------------------------------------------------------------------------------------------------------------------------------------------------------------------------------------------------------------------------------------------------------------------------------------------------------------------------------------------------------------------------------------------------------------------------------------------------------------- |
| **FAIL undefined** or **Array no session** | Go to **Settings** → **Data Export** and click the pink **Clear Xero Token**. Navigate back to the same page and click **Authorise Xero**. Log into your Xero to re-establish the connection. Sync pay items and try the export again. |
| **Employee doesn't have a pay run calendar** | Make sure the worker has a pay calendar set in Xero. |
| **FAIL! Null** | This occurs when too many first aid allowances are exported. Select fewer items for export. |
| **Employee name not found in Xero** | Go to the worker profile and make sure a worker accounting code is selected. This error is also caused by an apostrophe in the employee name on Xero preventing the data from being read. Remove the apostrophe from the Xero contact, resync, reselect the worker accounting code, and try the export again. |
| **FAIL: Earnings Rate does not exist or is not valid for timesheets** | Check the pay item on Xero. Common causes: (1) the **Types of Units** for the pay item is not set to **Hours**, (2) the Xero pay item is not set up or active, (3) exporting a payroll code not in the pay template for the employee, (4) the pay item is set as an allowance, or (5) an apostrophe in a pay item name. Make sure the item is correctly set up as OTE or Reimbursement with Type of Units as Hours and is active. If using pay templates, make sure it has been added to the template. Remove any apostrophes in pay items, resync, and try the export again. |
| **TrackingItemID is required for each timesheet line** | This occurs when timesheet tracking is enabled in Xero but not set up in Visualcare. Either disable timesheet tracking on Xero or contact [support@visualcare.com.au](mailto:support@visualcare.com.au) to set up timesheet tracking. Have your Xero category name and options ready along with the Visualcare field you'd like to map to. |
| **FAIL A validation exception occurred** | This is due to a mismatch with the kilometre pay type and pay codes. Go to **Settings** → **Finance** → **Kilometre** and check how your KM pay codes are set up in Xero. Then go to **Settings** → **Data Export** → **XERO** → **KM Pay Type** and select **pay item** if the codes are Ordinary Time Earnings, or **reimbursement** if they're reimbursements. |
| **No pay runs found** | This occurs when you export kilometres without a matching pay run. Create a pay run in Xero for the time period and try the KM export again. |
| **No payslips found on payrun** | This occurs when you attempt to export kilometres or expenses but the timesheets have not been approved in Xero. Approve timesheets in Xero and try the export again. |
| **Provided period doesn't correspond with a pay period** | Check the pay calendar set up on Xero for the employee. |

 ## Running into issues?
See [Integration troubleshooting](/troubleshooting/integration-issues) for additional common errors and fixes.
## Related articles
Connect Visualcare to KeyPay for payroll export
How to export timesheets and payroll data from Visualcare
Overview of billing and claiming in Visualcare
Set up and manage invoice data sync
## Running into issues?
See [Integration troubleshooting](/troubleshooting/integration-issues) for additional common errors and fixes.
## Related articles
Connect Visualcare to KeyPay for payroll export
How to export timesheets and payroll data from Visualcare
Overview of billing and claiming in Visualcare
Set up and manage invoice data sync