> ## Documentation Index
> Fetch the complete documentation index at: https://support.visualcare.com.au/llms.txt
> Use this file to discover all available pages before exploring further.
# CHSP / DEX Stage 3: setting up reporting on your services
# **Summary**
This article covers how to set up DEX Stage 3 reporting on your CHSP services. For an overview of what Stage 3 is and the key dates, see [CHSP / DEX Stage 3: what is changing and what you need to do](/industry-updates/chsp-dex-stage-3-what-is-changing-and-what-you-need-to-do)
## **Before you start**
* This applies only to services that have a CHSP service type.
* You will set DEX Reporting details on your CHSP services, create service variations where your delivery varies, and check your Worker Types.
* Set this up before 11 August 2026 so delivery from 1 July is captured correctly.
## **How Stage 3 fields work in Visualcare**
The new fields are handled in two ways:
* Set once on the service, under Maintenance > Services using DEX Reporting. These are session location, overnight support, meals provided, texture modified, meals cooked offsite, and the meal type counts.
* Worked out automatically when you export to DEX, with no setup required. Subcontractor and volunteer involvement are determined from the assigned worker's Worker Type.
The DEX Reporting details are not shown on the roster. When rostering, staff simply select the service that matches what was delivered, and the reporting detail follows from the service.
## **Step 1: Set the DEX Reporting details on a service**
1. Go to Maintenance > Services and open a CHSP service.
2. Select the DEX Reporting button. This appears only for services with a CHSP service type.
3. Complete the fields that apply to the service. Not all fields apply to every service, so complete only those relevant to the service's DEX activity:
* Session Location (Home or Community): Meal delivery, Flexible respite, Individual social support.
* Overnight support (Yes/No): Flexible respite. Set this to Yes for an overnight respite service.
* Meals provided (Yes/No): respite services.
* Texture modified items (Yes/No): Meal delivery and respite where meals are provided.
* Meals cooked offsite (Yes/No): Meal delivery.
* Meal type counts (Main, Light, Dessert, Beverage, Snack): Meal delivery and respite where meals are provided. Enter the number of each meal type this service provides.
4. Select Save.
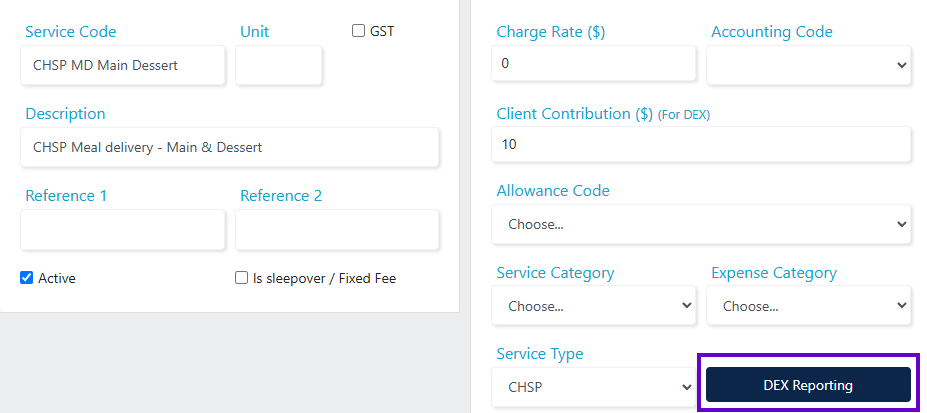
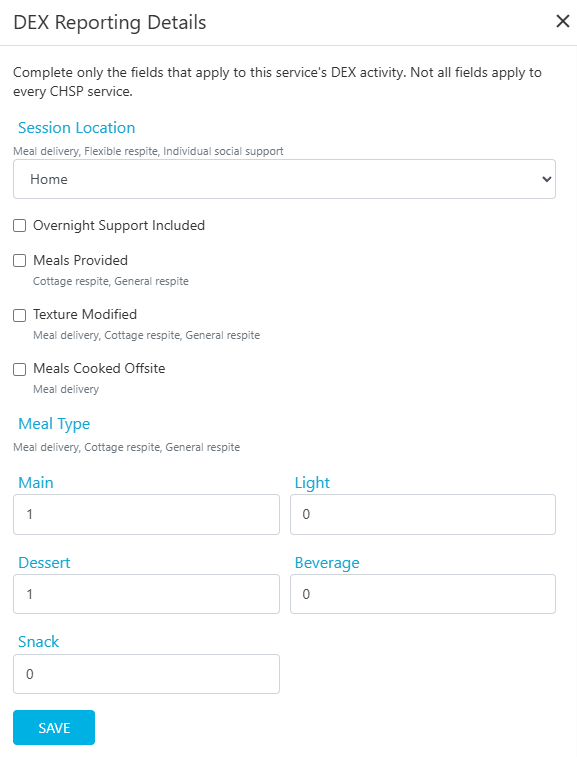 Session Location is blank by default so you actively choose it. Yes/No fields default to No and meal counts default to 0.
## **Step 2: Create service variations for different combinations**
Because these details are set on the service, one service represents one combination. Where your delivery varies, create a separate service for each combination and select the matching one when rostering.
Include the combination in the service description so rostering staff can pick the right one by name. For example, a Meal delivery service could be split into:
* Meal delivery - Main only
* Meal delivery - Main & Dessert
* Meal delivery - Main, Dessert & Beverage
The same applies to location and overnight. Because both are set on the service, create a separate service for each combination you deliver. For example:
* Flexible respite - Home
* Flexible respite - Home, Overnight
* Flexible respite - Community
For a variation to be available to select for a client, it needs to be on that client's agreement. Add the applicable variations to the client agreement, either individually or in bulk.
If a participant's delivery differs on a given day, for example they usually have main only but choose dessert that day, select the matching service on that day's roster shift. If the shift has already moved to a timesheet, change the service on the timesheet.
You cannot edit Stage 3 values directly on a shift or timesheet. The values follow the service, so selecting a different service is how you change them.
## **Step 3: Check your Worker Types**
Subcontractor and volunteer involvement are worked out automatically from the assigned worker's Worker Type at export. You do not set them on the service or the shift.
Set the Worker Type in the worker profile, under the Finance tab, in the Worker Type field.
* For subcontracted delivery to report as subcontractor, the worker's type must be Broker, Supplier, or Contractor. If a subcontracted worker is set to another type, for example Service Provider or Independent Support Worker, the session will report as not subcontracted.
* For volunteers, set the Worker Type to Volunteer.
* If no worker is assigned to a shift, both subcontractor and volunteer report as No.
On location rosters with more than one worker assigned to a session:
* Subcontractor reports as Yes if any assigned worker is a Broker, Supplier, or Contractor.
* Volunteer reports as Yes if more than half of the assigned workers are volunteers.
## **How changes to a service apply**
When you change and save a DEX Reporting field on a service, the change applies to all shifts and timesheets that use that service, past, present, and future, and is included in your next DEX export. Visualcare shows a confirmation before you save.
Because of this, do not repurpose an existing service to represent a different combination. Create a new service variation instead, so existing records keep their correct values.
Session Location is blank by default so you actively choose it. Yes/No fields default to No and meal counts default to 0.
## **Step 2: Create service variations for different combinations**
Because these details are set on the service, one service represents one combination. Where your delivery varies, create a separate service for each combination and select the matching one when rostering.
Include the combination in the service description so rostering staff can pick the right one by name. For example, a Meal delivery service could be split into:
* Meal delivery - Main only
* Meal delivery - Main & Dessert
* Meal delivery - Main, Dessert & Beverage
The same applies to location and overnight. Because both are set on the service, create a separate service for each combination you deliver. For example:
* Flexible respite - Home
* Flexible respite - Home, Overnight
* Flexible respite - Community
For a variation to be available to select for a client, it needs to be on that client's agreement. Add the applicable variations to the client agreement, either individually or in bulk.
If a participant's delivery differs on a given day, for example they usually have main only but choose dessert that day, select the matching service on that day's roster shift. If the shift has already moved to a timesheet, change the service on the timesheet.
You cannot edit Stage 3 values directly on a shift or timesheet. The values follow the service, so selecting a different service is how you change them.
## **Step 3: Check your Worker Types**
Subcontractor and volunteer involvement are worked out automatically from the assigned worker's Worker Type at export. You do not set them on the service or the shift.
Set the Worker Type in the worker profile, under the Finance tab, in the Worker Type field.
* For subcontracted delivery to report as subcontractor, the worker's type must be Broker, Supplier, or Contractor. If a subcontracted worker is set to another type, for example Service Provider or Independent Support Worker, the session will report as not subcontracted.
* For volunteers, set the Worker Type to Volunteer.
* If no worker is assigned to a shift, both subcontractor and volunteer report as No.
On location rosters with more than one worker assigned to a session:
* Subcontractor reports as Yes if any assigned worker is a Broker, Supplier, or Contractor.
* Volunteer reports as Yes if more than half of the assigned workers are volunteers.
## **How changes to a service apply**
When you change and save a DEX Reporting field on a service, the change applies to all shifts and timesheets that use that service, past, present, and future, and is included in your next DEX export. Visualcare shows a confirmation before you save.
Because of this, do not repurpose an existing service to represent a different combination. Create a new service variation instead, so existing records keep their correct values.